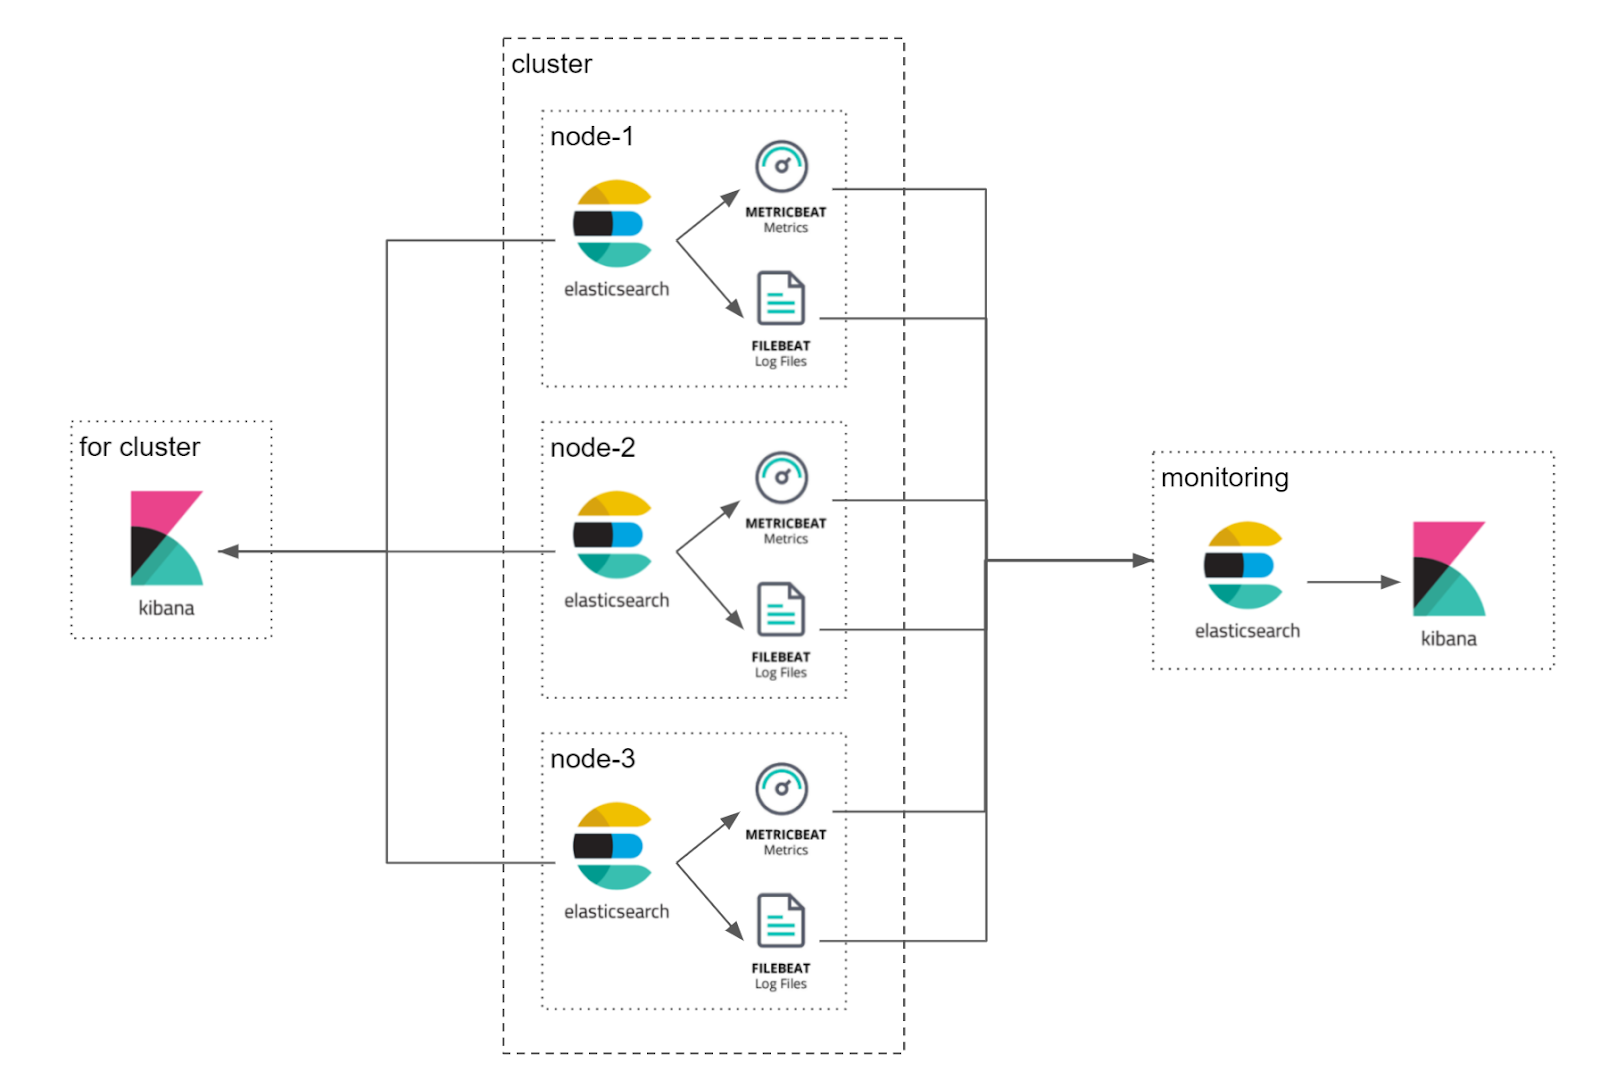
elasticsearch node 에 설치된 곳에 metricbeat 을 설치하여 node 상태를 모니터링 할 수 있다.
basic license 기준 하나의 cluster 에 대해 모니터링 가능하며 7일 동안 데이터가 .monitoring-* 인덱스에 저장된다.
- Reference
- security : https://www.elastic.co/guide/en/elasticsearch/reference/7.12/security-minimal-setup.html#security-create-builtin-users
- TLS : https://www.elastic.co/guide/en/elasticsearch/reference/7.12/security-basic-setup.html
- HTTPS : https://www.elastic.co/guide/en/elasticsearch/reference/7.12/security-basic-setup-https.html
- 참고 사항
- docker container 를 사용하였으며 별도 k8s 구성이 아니므로 host network 을 사용해야 한다.
- kibana 의 stack monitoring 사용시 merixbeat 는 8.0.0 부터 필수이다. 이하 버전에선 metricbeat 를 사용하라고 경고 메시지가 발생한다.
- TLS 는 transport 와 http 에 적용할 수 있다.
- 인증서의 도메인과 ip 가 다른 경우 verification_mode=none 을 사용할 수 있다.
- https 사용시엔 사설 인증서 사용시 검증된 인증기관이 아니라서 에러가 발생한다. 해결 방법은 아래와 같다.
- [방법1] 유료 인증서를 사용한다. - 1년 마다 교체해야한다.
- [방법2] 생성한 관련 키 파일들을 client 에 넣어 사용하는 방법이 있다.
- https://www.elastic.co/guide/en/elasticsearch/client/java-rest/7.12/_encrypted_communication.html (spring starter 설정 사용 못함)
- [방법3] SSL certificate verification 해당 체크를 무시하도록 설정한다.
- [방법4] AWS 같은 경우 elasticsearch 앞에 ELB 를 두고 https 로 사용한다.
- cluster 환경에서 security (계정 관리) 기능을 사용하려면 최소한 transport 에 TLS 가 적용되어있어야 한다. 그렇지 않으면 node 재시작시 에러가 발생하여 재시작할 수 없다.
- security 설정이 되면 kibana 의 stack monitoring 메뉴에서 security 메뉴를 확인할 수 있다.
TLS 설정을 위한 key 파일 생성 방법 (elasticsearch-certuril)
elasticsearch node container 를 사용하여 TLS 설정시 필요한 키 파일을 생성한 후 삭제한다.
아래 스크립트는 ~/tmp-es 에 생성된 파일들은 각종 키 파일들이므로 별도 저장하여 보관한다.
####################################################
## TLS(SSL) 인증서 설정
## elastic-stack-ca.p12 : CA 파일
## elastic-certificates.p12 : private key 파일
## elasticsearch : https 용


mkdir ~/tmp-es | true && cd ~/tmp-es &&\
\
# 인증서 생성용 es &&\
docker stop tmp-es | true && docker rm tmp-es | true &&\
docker run -itd --name tmp-es \
-e discovery.type=single-node \
-e xpack.security.enabled=true \
elasticsearch:7.12.0 &&\
\
# CA 파일 생성 : /usr/share/elasticsearch/elastic-stack-ca.p12 에 생성됨. &&\
# CA 파일 : elastic-stack-ca.p12 &&\
# CA 암호 : QpuL8qTj3Kg53Tdd &&\
docker exec -it tmp-es /bin/bash -c "elasticsearch-certutil ca <<'EOF'
elastic-stack-ca.p12
QpuL8qTj3Kg53Tdd
EOF
" &&\
\
# private key 파일 생성 : /usr/share/elasticsearch/elastic-certificates.p12 에 생성됨. &&\
# private key 파일 : elastic-certificates.p12 &&\
# private key 암호 : HCkjw8qNhxdARGnT &&\
docker exec -it tmp-es /bin/bash -c "elasticsearch-certutil cert --ca elastic-stack-ca.p12 <<'EOF'
QpuL8qTj3Kg53Tdd
elastic-certificates.p12
HCkjw8qNhxdARGnT
EOF
" &&\
\
# ca 파일 복사 &&\
docker cp tmp-es:/usr/share/elasticsearch/elastic-stack-ca.p12 ./ &&\
docker cp tmp-es:/usr/share/elasticsearch/elastic-certificates.p12 ./ &&\
\
\
## es https file &&\
# 암호 : 7JUXTKU7PZ795pzu &&\
# 생성 파일 : /usr/share/elasticsearch/elasticsearch-ssl-http.zip &&\
docker exec -it tmp-es /bin/bash -c "elasticsearch-certutil http <<'EOF'
n
y
/usr/share/elasticsearch/elastic-stack-ca.p12
QpuL8qTj3Kg53Tdd
100y
n
*

y

y
n
7JUXTKU7PZ795pzu
7JUXTKU7PZ795pzu

EOF
" &&\
docker cp tmp-es:/usr/share/elasticsearch/elasticsearch-ssl-http.zip ./ &&\
sudo apt -y install unzip &&\
unzip elasticsearch-ssl-http.zip && rm -rf elasticsearch-ssl-http.zip &&\
\
# kibana https &&\
docker exec -it tmp-es /bin/bash -c "elasticsearch-certutil csr -name kibana-server -dns * <<'EOF'
csr-bundle.zip
EOF
" &&\
docker cp tmp-es:/usr/share/elasticsearch/csr-bundle.zip ./ &&\
unzip csr-bundle.zip && rm -rf csr-bundle.zip &&\
\
# .crt &&\
openssl x509 -req -days 365 -in kibana-server/kibana-server.csr -signkey kibana-server/kibana-server.key -out kibana-server/kibana-server.crt &&\
\
# 삭제 &&\
docker stop tmp-es && docker rm tmp-es &&\
ls -al
위 명령 실행시 생성되는 파일들은 아래와 같다.
├── elastic-certificates.p12 # certificate 파일. es node 간 transport 통신이 TLS 적용에 사용(9300)
├── elastic-stack-ca.p12 # CA 파일
├── elasticsearch
│ ├── README.txt
│ ├── http.p12 # es node 의 https 통신에 사용(9200)
│ └── sample-elasticsearch.yml # node 설정시 필요한 옵션 샘플
└── kibana
│ ├── README.txt
│ ├── elasticsearch-ca.pem # kibana 에서 es node 통신시 사용
│ └── sample-kibana.yml # node 설정시 필요한 옵션 샘플
└── kibana-server # kibana 에 https 적용시 사용 (https://www.elastic.co/guide/en/elasticsearch/reference/7.12/security-basic-setup-https.html#encrypt-kibana-browser). 인증기관 .crt 필요하므로 미사용.
├── kibana-server.csr
└── kibana-server.key
Single Node - security
TLS 를 설정하지 않으므로 키 파일을 사용하지 않는다.
# elasticsearch node 생성
cd ~/tmp-es &&\
\
mkdir -p /service/otoplug/data/es /service/otoplug/log/es &&\
\
docker stop es | true && docker rm es | true &&\
docker run --restart="always" -itd --name es --net host --user $UID \
-p 9200:9200 -p 9300:9300 \
-e http.port=9200 \
-e transport.port=9300 \
-e cluster.name=cluster-1 \
-e node.name=node-1 \
-e discovery.type=single-node \
-e xpack.security.enabled=true \
-v /service/otoplug/log/es:/usr/share/elasticsearch/logs \
-v /service/otoplug/data/es:/usr/share/elasticsearch/data \
elasticsearch:7.12.0 &&\
\
sleep 3s &&\
\
# enable file logging &&\
docker exec -it --user=root es /bin/bash -c "cp -f /usr/share/elasticsearch/config/log4j2.properties /usr/share/elasticsearch/config/log4j2.console.properties" &&\
docker exec -it --user=root es /bin/bash -c "cp -f /usr/share/elasticsearch/config/log4j2.file.properties /usr/share/elasticsearch/config/log4j2.properties" &&\
\
\
docker restart es
# 계정 암호 설정
######################################################  &&\
# 기본 계정 암호 생성 : 한번만 실행 가능 &&\
#   암호 자동 생성 : 출력되는 암호를 기록해 두어야 한다. &&\
#     docker exec -it es elasticsearch-setup-passwords auto &&\
#   암호 직접 생성 : 입력 화면이 나오고 계정마다 원하는 암호 입력 &&\
#     암호 입력 순서 : elastic, apm_system, kibana_system, logstash_system, beats_system, remote_monitoring_user &&\
#     apm_system / 6PRiP76VQu7bZdAOocMK &&\
#     kibana_system / RwPzKjrx27O79qpqsI4d &&\
#     kibana / RwPzKjrx27O79qpqsI4d &&\
#     logstash_system / ejctxhtls7kmKXkaFdzh &&\
#     beats_system / 8tn52g4QnPvjcWZSwe54 &&\
#     remote_monitoring_user / Mv7uumqwknG1W8zJog0r &&\
#     elastic / i3UGSOjGzpScS0HG6KPT &&\
docker exec -i es elasticsearch-setup-passwords interactive <<'EOF'
y
i3UGSOjGzpScS0HG6KPT
i3UGSOjGzpScS0HG6KPT
6PRiP76VQu7bZdAOocMK
6PRiP76VQu7bZdAOocMK
RwPzKjrx27O79qpqsI4d
RwPzKjrx27O79qpqsI4d
ejctxhtls7kmKXkaFdzh
ejctxhtls7kmKXkaFdzh
8tn52g4QnPvjcWZSwe54
8tn52g4QnPvjcWZSwe54
Mv7uumqwknG1W8zJog0r
Mv7uumqwknG1W8zJog0r
EOF
&&\
docker logs -f es
# 테스트
curl -v http://localhost:9200 -u elastic:i3UGSOjGzpScS0HG6KPT
# Kibana 생성- superuser 로그인 : elastic / i3UGSOjGzpScS0HG6KPT
docker stop kibana | true && docker rm kibana | true &&\
\
docker run --restart="always" -itd --name kibana --net host \
-p 5601:5601 \
-e ELASTICSEARCH_HOSTS='["http://localhost:9200"]' \
-e ELASTICSEARCH_USERNAME=kibana_system \
-e XPACK_ENCRYPTEDSAVEDOBJECTS_ENCRYPTIONKEY=1dc16ed42aad17712d91a8047a7edfbd \
kibana:7.12.0 &&\
\
docker exec -it kibana kibana-keystore create &&\
docker exec -it kibana /bin/bash -c "kibana-keystore add elasticsearch.password <<'EOF'
RwPzKjrx27O79qpqsI4d
EOF
" &&\
docker restart kibana &&\
docker logs -f kibana
Single Node - securitl, tls (transport, https)
# elasticsearch node 생성
cd ~/tmp-es &&\
\
mkdir -p /service/otoplug/data/es /service/otoplug/log/es &&\
\
docker stop es | true && docker rm es | true &&\
docker run --restart="always" -itd --name es --net host --user $UID \
-p 9200:9200 -p 9300:9300 \
-e http.port=9200 \
-e transport.port=9300 \
-e cluster.name=cluster-1 \
-e node.name=node-1 \
-e discovery.type=single-node \
-e xpack.security.enabled=true \
-e xpack.security.transport.ssl.enabled=true \
-e xpack.security.transport.ssl.verification_mode=none  \
-e xpack.security.transport.ssl.client_authentication=required \
-e xpack.security.transport.ssl.keystore.path=elastic-certificates.p12 \
-e xpack.security.transport.ssl.truststore.path=elastic-certificates.p12 \
-e xpack.security.http.ssl.enabled=true \
-e xpack.security.http.ssl.keystore.path=http.p12 \
-e xpack.security.http.ssl.verification_mode=none \
-v /service/otoplug/log/es:/usr/share/elasticsearch/logs \
-v /service/otoplug/data/es:/usr/share/elasticsearch/data \
elasticsearch:7.12.0 &&\
\
sleep 3s &&\
\
# enable file logging &&\
docker exec -it --user=root es /bin/bash -c "cp -f /usr/share/elasticsearch/config/log4j2.properties /usr/share/elasticsearch/config/log4j2.console.properties" &&\
docker exec -it --user=root es /bin/bash -c "cp -f /usr/share/elasticsearch/config/log4j2.file.properties /usr/share/elasticsearch/config/log4j2.properties" &&\
\
# transport &&\
docker cp ./elastic-certificates.p12 es:/usr/share/elasticsearch/config/ &&\
\
docker exec -it es /bin/bash -c "elasticsearch-keystore add xpack.security.transport.ssl.keystore.secure_password <<'EOF'
HCkjw8qNhxdARGnT
EOF
" &&\
docker exec -it es /bin/bash -c "elasticsearch-keystore add xpack.security.transport.ssl.truststore.secure_password <<'EOF'
HCkjw8qNhxdARGnT
EOF
" &&\
\
# https &&\
docker cp ./elasticsearch/http.p12 es:/usr/share/elasticsearch/config &&\
\
docker exec -it es /bin/bash -c "elasticsearch-keystore add xpack.security.http.ssl.keystore.secure_password <<'EOF'
7JUXTKU7PZ795pzu
EOF
"
# 계정 암호 설정
######################################################  &&\
# 기본 계정 암호 생성 : 한번만 실행 가능 &&\
#   암호 자동 생성 : 출력되는 암호를 기록해 두어야 한다. &&\
#     docker exec -it es elasticsearch-setup-passwords auto &&\
#   암호 직접 생성 : 입력 화면이 나오고 계정마다 원하는 암호 입력 &&\
#     암호 입력 순서 : elastic, apm_system, kibana_system, logstash_system, beats_system, remote_monitoring_user &&\
#     apm_system / 6PRiP76VQu7bZdAOocMK &&\
#     kibana_system / RwPzKjrx27O79qpqsI4d &&\
#     kibana / RwPzKjrx27O79qpqsI4d &&\
#     logstash_system / ejctxhtls7kmKXkaFdzh &&\
#     beats_system / 8tn52g4QnPvjcWZSwe54 &&\
#     remote_monitoring_user / Mv7uumqwknG1W8zJog0r &&\
#     elastic / i3UGSOjGzpScS0HG6KPT &&\
docker exec -i es elasticsearch-setup-passwords interactive <<'EOF'
y
i3UGSOjGzpScS0HG6KPT
i3UGSOjGzpScS0HG6KPT
6PRiP76VQu7bZdAOocMK
6PRiP76VQu7bZdAOocMK
RwPzKjrx27O79qpqsI4d
RwPzKjrx27O79qpqsI4d
ejctxhtls7kmKXkaFdzh
ejctxhtls7kmKXkaFdzh
8tn52g4QnPvjcWZSwe54
8tn52g4QnPvjcWZSwe54
Mv7uumqwknG1W8zJog0r
Mv7uumqwknG1W8zJog0r
EOF
 &&\
\
docker restart es &&\
docker logs -f es
# 접근 확인 테스트
curl -v -k https://localhost:9200 -u elastic:i3UGSOjGzpScS0HG6KPT
# Kibana 생성- superuser 로그인 : elastic / i3UGSOjGzpScS0HG6KPT
docker stop kibana | true && docker rm kibana | true &&\
\
docker run --restart="always" -itd --name kibana --net host \
-p 5601:5601 \
-e ELASTICSEARCH_HOSTS='["https://localhost:9200"]' \
-e ELASTICSEARCH_SSL_CERTIFICATEAUTHORITIES='config/elasticsearch-ca.pem' \
-e ELASTICSEARCH_SSL_VERIFICATIONMODE=none \
-e ELASTICSEARCH_USERNAME=kibana_system \
-e XPACK_ENCRYPTEDSAVEDOBJECTS_ENCRYPTIONKEY=1dc16ed42aad17712d91a8047a7edfbd \
kibana:7.12.0 &&\
\
docker cp ./kibana/elasticsearch-ca.pem kibana:/usr/share/kibana/config/ &&\
\
docker exec -it kibana kibana-keystore create &&\
docker exec -it kibana /bin/bash -c "kibana-keystore add elasticsearch.password <<'EOF'
RwPzKjrx27O79qpqsI4d
EOF
" &&\
docker restart kibana &&\
docker logs -f kibana
Cluster - security, tls (transport + https)
1. 키, 암호 정보
* monitoring 용 TLS 키
CA
- 파일 : ~/tmp-es/mon/elastic-stack-ca.p12
- 암호 : W8B3X2eBLjafrZ6U
Certificate (private key)
- 파일 : ~/tmp-es/mon/elastic-certificates.p12
- 암호 : pnpXneCHdzbJW3q2
HTTPS
- 파일 : ~/tmp-es/mon/ 의 elasticsearch, kibana 디렉토리
- 암호 : 7QNqUHtfENpjT3zE
# 사용한 명령 - 스크립트 실행시 에 도메인과 IP 를 정확히 기입해야 한다.
mkdir ~/tmp-es/mon | true && cd ~/tmp-es/mon &&\
\
# 인증서 생성용 es &&\
docker stop tmp-es | true && docker rm tmp-es | true &&\
docker run -itd --name tmp-es \
-e discovery.type=single-node \
-e xpack.security.enabled=true \
elasticsearch:7.12.0 &&\
\
# CA 파일 생성 : /usr/share/elasticsearch/elastic-stack-ca.p12 에 생성됨. &&\
# CA 파일 : elastic-stack-ca.p12 &&\
# CA 암호 : W8B3X2eBLjafrZ6U &&\
docker exec -it tmp-es /bin/bash -c "elasticsearch-certutil ca <<'EOF'
elastic-stack-ca.p12
W8B3X2eBLjafrZ6U
EOF
" &&\
\
# private key 파일 생성 : /usr/share/elasticsearch/elastic-certificates.p12 에 생성됨. &&\
# private key 파일 : elastic-certificates.p12 &&\
# private key 암호 : pnpXneCHdzbJW3q2 &&\
docker exec -it tmp-es /bin/bash -c "elasticsearch-certutil cert --ca elastic-stack-ca.p12 <<'EOF'
W8B3X2eBLjafrZ6U
elastic-certificates.p12
pnpXneCHdzbJW3q2
EOF
" &&\
\
# ca 파일 복사 &&\
docker cp tmp-es:/usr/share/elasticsearch/elastic-stack-ca.p12 ./ &&\
docker cp tmp-es:/usr/share/elasticsearch/elastic-certificates.p12 ./ &&\
\
\
## es https file &&\
# 암호 : 7QNqUHtfENpjT3zE &&\
# 생성 파일 : /usr/share/elasticsearch/elasticsearch-ssl-http.zip &&\
docker exec -it tmp-es /bin/bash -c "elasticsearch-certutil http <<'EOF'
n
y
/usr/share/elasticsearch/elastic-stack-ca.p12
W8B3X2eBLjafrZ6U
100y
n
*
localhost
*.es.cluster

y
127.0.0.1
::1
172.31.12.163
172.31.7.63
172.31.28.63
172.31.28.45

y
n
7QNqUHtfENpjT3zE
7QNqUHtfENpjT3zE

EOF
" &&\
docker cp tmp-es:/usr/share/elasticsearch/elasticsearch-ssl-http.zip ./ &&\
sudo apt -y install unzip &&\
unzip elasticsearch-ssl-http.zip && rm -rf elasticsearch-ssl-http.zip &&\
\
\
# 삭제 &&\
docker stop tmp-es && docker rm tmp-es &&\
ls -al
* Cluster 용 TLS 키 및 계정 암호
CA
- 파일 : ~/tmp-es/es/elastic-stack-ca.p12
- 암호 : 7Z2DFdnJJBc6NtqJ
Certificate (private key)
- 파일 : ~/tmp-es/es/elastic-certificates.p12
- 암호 : Pavd499UgsauUWvy
HTTPS
- 파일 : ~/tmp-es/es/ 의 elasticsearch, kibana 디렉토리
- 암호 : 4TE9TNrqKKHnPM56
# 사용한 명령 - 스크립트 실행시 에 도메인과 IP 를 정확히 기입해야 한다

mkdir ~/tmp-es/es | true && cd ~/tmp-es/es &&\
\
# 인증서 생성용 es &&\
docker stop tmp-es | true && docker rm tmp-es | true &&\
docker run -itd --name tmp-es \
-e discovery.type=single-node \
-e xpack.security.enabled=true \
elasticsearch:7.12.0 &&\
\
# CA 파일 생성 : /usr/share/elasticsearch/elastic-stack-ca.p12 에 생성됨. &&\
# CA 파일 : elastic-stack-ca.p12 &&\
# CA 암호 : 7Z2DFdnJJBc6NtqJ &&\
docker exec -it tmp-es /bin/bash -c "elasticsearch-certutil ca <<'EOF'
elastic-stack-ca.p12
7Z2DFdnJJBc6NtqJ
EOF
" &&\
\
# private key 파일 생성 : /usr/share/elasticsearch/elastic-certificates.p12 에 생성됨. &&\
# private key 파일 : elastic-certificates.p12 &&\
# private key 암호 : Pavd499UgsauUWvy &&\
docker exec -it tmp-es /bin/bash -c "elasticsearch-certutil cert --ca elastic-stack-ca.p12 <<'EOF'
7Z2DFdnJJBc6NtqJ
elastic-certificates.p12
Pavd499UgsauUWvy
EOF
" &&\
\
# ca 파일 복사 &&\
docker cp tmp-es:/usr/share/elasticsearch/elastic-stack-ca.p12 ./ &&\
docker cp tmp-es:/usr/share/elasticsearch/elastic-certificates.p12 ./ &&\
\
\
## es https file &&\
# 암호 : 4TE9TNrqKKHnPM56 &&\
# 생성 파일 : /usr/share/elasticsearch/elasticsearch-ssl-http.zip &&\
docker exec -it tmp-es /bin/bash -c "elasticsearch-certutil http <<'EOF'
n
y
/usr/share/elasticsearch/elastic-stack-ca.p12
7Z2DFdnJJBc6NtqJ
100y
n
*
localhost
*.es.cluster

y
127.0.0.1
::1
172.31.12.163
172.31.7.63
172.31.28.63
172.31.28.45

y
n
4TE9TNrqKKHnPM56
4TE9TNrqKKHnPM56

EOF
" &&\
docker cp tmp-es:/usr/share/elasticsearch/elasticsearch-ssl-http.zip ./ &&\
sudo apt -y install unzip &&\
unzip elasticsearch-ssl-http.zip && rm -rf elasticsearch-ssl-http.zip &&\
\
\
# 삭제 &&\
docker stop tmp-es && docker rm tmp-es &&\
ls -al
- monitoring 용 elasticsearch 계정 암호
- apm_system = Flojnt90VXjgt0S9O9ey
- kibana_system = VIEd22kY8DtL5tqwEsAq
- kibana = VIEd22kY8DtL5tqwEsAq
- logstash_system = aTOvzx8bnjWLxBiSfnHE
- beats_system = fiPUPLnBf0tR5kBcSo16
- remote_monitoring_user = Qpn9mbaxS1DwvruPH2J0
- elastic = uOpqcL06cHWgJcNMiw1I
- cluster 용 elasticsearch 계정 암호
- apm_system = kbb5SRKWwnuiqQtwU94Z
- kibana_system = L4RkhRw21U0ACPjxtpw9
- kibana = L4RkhRw21U0ACPjxtpw9
- logstash_system = kPFj9haaiY9n3jSgXWrz
- beats_system = 8dSKkRFReZaRWNR3QJU3
- remote_monitoring_user = uZmgaCuqI8pjM5OIBg4k
- elastic = fqkVXD2oLV2jDpX0KDHy
- kibana encriptionkey
- monitoring 용 kibana : 1dc16ed42aad17712d91a8047a7edfbd
- cluster 용 kibana : 1dc16ed42aad17712d91a8047a7edfbd
- 각 node 가 설치될 곳에 파일 복사
-
cd ~/tmp-es/
ssh -o StrictHostKeyChecking=no -i ec2.pem ubuntu@172.31.12.163 "mkdir -p /home/ubuntu/tmp-es/" && \
scp -o StrictHostKeyChecking=no -i ec2.pem -r ./mon ubuntu@172.31.12.163:/home/ubuntu/tmp-es/ && \
scp -o StrictHostKeyChecking=no -i ec2.pem -r ./es ubuntu@172.31.12.163:/home/ubuntu/tmp-es/ && \
ssh -o StrictHostKeyChecking=no -i ec2.pem ubuntu@172.31.7.63 "mkdir -p /home/ubuntu/tmp-es/" && \
scp -o StrictHostKeyChecking=no -i ec2.pem -r ./mon ubuntu@172.31.7.63:/home/ubuntu/tmp-es/ && \
scp -o StrictHostKeyChecking=no -i ec2.pem -r ./es ubuntu@172.31.7.63:/home/ubuntu/tmp-es/ && \
ssh -o StrictHostKeyChecking=no -i ec2.pem ubuntu@172.31.28.63 "mkdir -p /home/ubuntu/tmp-es/" && \
scp -o StrictHostKeyChecking=no -i ec2.pem -r ./mon ubuntu@172.31.28.63:/home/ubuntu/tmp-es/ && \
scp -o StrictHostKeyChecking=no -i ec2.pem -r ./es ubuntu@172.31.28.63:/home/ubuntu/tmp-es/
-
2. monitoring 용 elasticsearch/kibana 설치
# monitoring 용 elasticsearch node 설치
cd ~/tmp-es &&\
\
docker stop mon-es | true && docker rm mon-es | true &&\
\
rm -rf /service/otoplug/data/mon-es/* /service/otoplug/log/mon-es/* &&\
mkdir -p /service/otoplug/data/mon-es /service/otoplug/log/mon-es &&\
\
docker run --restart="always" -itd --name mon-es --net host --user $UID \
-p 9200:9200 -p 9300:9300 \
-e http.port=9200 \
-e transport.port=9300 \
-e discovery.type=single-node \
-e xpack.security.enabled=true \
-e xpack.security.transport.ssl.enabled=true \
-e xpack.security.transport.ssl.verification_mode=certificate \
-e xpack.security.transport.ssl.client_authentication=required \
-e xpack.security.transport.ssl.keystore.path=elastic-certificates.p12 \
-e xpack.security.transport.ssl.truststore.path=elastic-certificates.p12 \
-e xpack.security.http.ssl.enabled=true \
-e xpack.security.http.ssl.keystore.path=http.p12 \
-e xpack.security.http.ssl.verification_mode=certificate \
-v /service/otoplug/log/mon-es:/usr/share/elasticsearch/logs \
-v /service/otoplug/data/mon-es:/usr/share/elasticsearch/data \
elasticsearch:7.12.0 &&\
\
sleep 3s &&\
\
# enable file logging &&\
docker exec -it --user=root mon-es /bin/bash -c "cp -f /usr/share/elasticsearch/config/log4j2.properties /usr/share/elasticsearch/config/log4j2.console.properties" &&\
docker exec -it --user=root mon-es /bin/bash -c "cp -f /usr/share/elasticsearch/config/log4j2.file.properties /usr/share/elasticsearch/config/log4j2.properties" &&\
\
# transport &&\
docker cp ./mon/elastic-certificates.p12 mon-es:/usr/share/elasticsearch/config/ &&\
\
docker exec -it mon-es /bin/bash -c "elasticsearch-keystore add xpack.security.transport.ssl.keystore.secure_password <<'EOF'
pnpXneCHdzbJW3q2
EOF
" &&\
docker exec -it mon-es /bin/bash -c "elasticsearch-keystore add xpack.security.transport.ssl.truststore.secure_password <<'EOF'
pnpXneCHdzbJW3q2
EOF
" &&\
\
# https &&\
docker cp ./mon/elasticsearch/http.p12 mon-es:/usr/share/elasticsearch/config &&\
\
docker exec -it mon-es /bin/bash -c "elasticsearch-keystore add xpack.security.http.ssl.keystore.secure_password <<'EOF'
7QNqUHtfENpjT3zE
EOF
" &&\
docker restart mon-es &&\
docker logs -f mon-es
# monotoring elasticsearch security 설정 및 테스트

# 구동 완료후 실행
# 계정 암호 설정
docker exec -i mon-es elasticsearch-setup-passwords interactive -url "https://localhost:9200" <<'EOF'
y
uOpqcL06cHWgJcNMiw1I
uOpqcL06cHWgJcNMiw1I
Flojnt90VXjgt0S9O9ey
Flojnt90VXjgt0S9O9ey
VIEd22kY8DtL5tqwEsAq
VIEd22kY8DtL5tqwEsAq
aTOvzx8bnjWLxBiSfnHE
aTOvzx8bnjWLxBiSfnHE
fiPUPLnBf0tR5kBcSo16
fiPUPLnBf0tR5kBcSo16
Qpn9mbaxS1DwvruPH2J0
Qpn9mbaxS1DwvruPH2J0
EOF


# tls 테스트
curl -v -k https://localhost:9200 -u elastic:uOpqcL06cHWgJcNMiw1I
## monitoring kibana : mon-kibana
## key 는 "docker exec -it kibana kibana-encryption-keys generate" 를 통해 생성 가능하다.

cd ~/tmp-es/
docker stop mon-kibana | true && docker rm mon-kibana | true && \
\
docker run --restart="always" -itd --name mon-kibana --net host \
-p 15601:15601 \
-e SERVER_PORT=15601 \
-e ELASTICSEARCH_HOSTS='["https://localhost:9200"]' \
-e ELASTICSEARCH_SSL_CERTIFICATEAUTHORITIES='config/elasticsearch-ca.pem' \
-e ELASTICSEARCH_SSL_VERIFICATIONMODE=certificate \
-e XPACK_ENCRYPTEDSAVEDOBJECTS_ENCRYPTIONKEY=1dc16ed42aad17712d91a8047a7edfbd \
-e ELASTICSEARCH_USERNAME=kibana_system \
kibana:7.12.0 && \
\
docker cp ./mon/kibana/elasticsearch-ca.pem mon-kibana:/usr/share/kibana/config/ &&\
\
docker exec -it mon-kibana kibana-keystore create &&\
docker exec -it mon-kibana /bin/bash -c "kibana-keystore add elasticsearch.password <<'EOF'
VIEd22kY8DtL5tqwEsAq
EOF
" &&\
docker restart mon-kibana &&\
docker exec -it mon-kibana ls -al /usr/share/kibana/config/ &&\
docker logs -f mon-kibana
3. cluster 용 elasticsearch 설치
## node-1 - 172.31.12.163
set -x
cd ~/tmp-es/
mkdir -p /service/otoplug/data/es /service/otoplug/log/es && \
rm -rf /service/otoplug/data/es/* /service/otoplug/log/es/* &&\
\
docker stop es | true && docker rm es | true &&\
docker run --restart="always" -itd --net host --name es --user $UID \
-p 9200:9200 -p 9300:9300 \
--cpus="2.0" \
-e network.host=172.31.12.163 \
-e cluster.name=cluster-1 \
-e node.name=node-1 \
-e node.master=true \
-e node.data=true \
-e discovery.seed_hosts=172.31.12.163,172.31.7.63,172.31.28.63 \
-e cluster.initial_master_nodes=node-1,node-2,node-3 \
-e bootstrap.memory_lock=true \
-e xpack.monitoring.collection.enabled=true \
-e xpack.monitoring.elasticsearch.collection.enabled=false \
-e xpack.security.enabled=true \
-e xpack.security.transport.ssl.enabled=true \
-e xpack.security.transport.ssl.verification_mode=certificate  \
-e xpack.security.transport.ssl.client_authentication=required \
-e xpack.security.transport.ssl.keystore.path=elastic-certificates.p12 \
-e xpack.security.transport.ssl.truststore.path=elastic-certificates.p12 \
-e xpack.security.http.ssl.enabled=true \
-e xpack.security.http.ssl.verification_mode=certificate \
-e xpack.security.http.ssl.keystore.path=http.p12 \
-e "ES_JAVA_OPTS=-Xms1g -Xmx1g" \
--ulimit memlock=-1:-1 \
-v /service/otoplug/log/es:/usr/share/elasticsearch/logs \
-v /service/otoplug/data/es:/usr/share/elasticsearch/data \
docker.elastic.co/elasticsearch/elasticsearch:7.12.0 && \
\
# enable file logging &&\
docker exec -it --user=root es /bin/bash -c "cp -f /usr/share/elasticsearch/config/log4j2.properties /usr/share/elasticsearch/config/log4j2.console.properties" && \
docker exec -it --user=root es /bin/bash -c "cp -f /usr/share/elasticsearch/config/log4j2.file.properties /usr/share/elasticsearch/config/log4j2.properties" && \
\
# tls transport &&\
docker cp ./es/elastic-certificates.p12 es:/usr/share/elasticsearch/config/ &&\
\
docker exec -it es /bin/bash -c "elasticsearch-keystore add xpack.security.transport.ssl.keystore.secure_password <<'EOF'
y
Pavd499UgsauUWvy
EOF
" &&\
docker exec -it es /bin/bash -c "elasticsearch-keystore add xpack.security.transport.ssl.truststore.secure_password <<'EOF'
Pavd499UgsauUWvy
EOF
" &&\
\
# tls https &&\
docker cp ./es/elasticsearch/http.p12 es:/usr/share/elasticsearch/config &&\
\
docker exec -it es /bin/bash -c "elasticsearch-keystore add xpack.security.http.ssl.keystore.secure_password <<'EOF'
4TE9TNrqKKHnPM56
EOF
" &&\
\
sleep 10s &&\
docker restart es &&\
docker logs -f es
## node-2 - 172.31.7.63
set -x
cd ~/tmp-es/
mkdir -p /service/otoplug/data/es /service/otoplug/log/es && \
rm -rf /service/otoplug/data/es/* /service/otoplug/log/es/* &&\
\
docker stop es | true && docker rm es | true &&\
docker run --restart="always" -itd --net host --name es --user $UID \
-p 9200:9200 -p 9300:9300 \
--cpus="2.0" \
-e network.host=172.31.7.63 \
-e cluster.name=cluster-1 \
-e node.name=node-2 \
-e node.master=true \
-e node.data=true \
-e discovery.seed_hosts=172.31.12.163,172.31.7.63,172.31.28.63 \
-e cluster.initial_master_nodes=node-1,node-2,node-3 \
-e bootstrap.memory_lock=true \
-e xpack.monitoring.collection.enabled=true \
-e xpack.monitoring.elasticsearch.collection.enabled=false \
-e xpack.security.enabled=true \
-e xpack.security.transport.ssl.enabled=true \
-e xpack.security.transport.ssl.verification_mode=certificate  \
-e xpack.security.transport.ssl.client_authentication=required \
-e xpack.security.transport.ssl.keystore.path=elastic-certificates.p12 \
-e xpack.security.transport.ssl.truststore.path=elastic-certificates.p12 \
-e xpack.security.http.ssl.enabled=true \
-e xpack.security.http.ssl.verification_mode=certificate \
-e xpack.security.http.ssl.keystore.path=http.p12 \
-e "ES_JAVA_OPTS=-Xms1g -Xmx1g" \
--ulimit memlock=-1:-1 \
-v /service/otoplug/log/es:/usr/share/elasticsearch/logs \
-v /service/otoplug/data/es:/usr/share/elasticsearch/data \
docker.elastic.co/elasticsearch/elasticsearch:7.12.0 && \
\
# enable file logging &&\
docker exec -it --user=root es /bin/bash -c "cp -f /usr/share/elasticsearch/config/log4j2.properties /usr/share/elasticsearch/config/log4j2.console.properties" && \
docker exec -it --user=root es /bin/bash -c "cp -f /usr/share/elasticsearch/config/log4j2.file.properties /usr/share/elasticsearch/config/log4j2.properties" && \
\
# tls transport &&\
docker cp ./es/elastic-certificates.p12 es:/usr/share/elasticsearch/config/ &&\
\
docker exec -it es /bin/bash -c "elasticsearch-keystore add xpack.security.transport.ssl.keystore.secure_password <<'EOF'
y
Pavd499UgsauUWvy
EOF
" &&\
docker exec -it es /bin/bash -c "elasticsearch-keystore add xpack.security.transport.ssl.truststore.secure_password <<'EOF'
Pavd499UgsauUWvy
EOF
" &&\
\
# tls https &&\
docker cp ./es/elasticsearch/http.p12 es:/usr/share/elasticsearch/config &&\
\
docker exec -it es /bin/bash -c "elasticsearch-keystore add xpack.security.http.ssl.keystore.secure_password <<'EOF'
4TE9TNrqKKHnPM56
EOF
" &&\
\
docker restart es &&\
docker logs -f es
## node-3 - 172.31.28.63
set -x
cd ~/tmp-es/
mkdir -p /service/otoplug/data/es /service/otoplug/log/es && \
rm -rf /service/otoplug/data/es/* /service/otoplug/log/es/* &&\
\
docker stop es | true && docker rm es | true &&\
docker run --restart="always" -itd --net host --name es --user $UID \
-p 9200:9200 -p 9300:9300 \
--cpus="2.0" \
-e network.host=172.31.28.63 \
-e cluster.name=cluster-1 \
-e node.name=node-3 \
-e node.master=true \
-e node.data=true \
-e discovery.seed_hosts=172.31.12.163,172.31.7.63,172.31.28.63 \
-e cluster.initial_master_nodes=node-1,node-2,node-3 \
-e bootstrap.memory_lock=true \
-e xpack.monitoring.collection.enabled=true \
-e xpack.monitoring.elasticsearch.collection.enabled=false \
-e xpack.security.enabled=true \
-e xpack.security.transport.ssl.enabled=true \
-e xpack.security.transport.ssl.verification_mode=certificate  \
-e xpack.security.transport.ssl.client_authentication=required \
-e xpack.security.transport.ssl.keystore.path=elastic-certificates.p12 \
-e xpack.security.transport.ssl.truststore.path=elastic-certificates.p12 \
-e xpack.security.http.ssl.enabled=true \
-e xpack.security.http.ssl.verification_mode=certificate \
-e xpack.security.http.ssl.keystore.path=http.p12 \
-e "ES_JAVA_OPTS=-Xms1g -Xmx1g" \
--ulimit memlock=-1:-1 \
-v /service/otoplug/log/es:/usr/share/elasticsearch/logs \
-v /service/otoplug/data/es:/usr/share/elasticsearch/data \
docker.elastic.co/elasticsearch/elasticsearch:7.12.0 && \
\
# enable file logging &&\
docker exec -it --user=root es /bin/bash -c "cp -f /usr/share/elasticsearch/config/log4j2.properties /usr/share/elasticsearch/config/log4j2.console.properties" && \
docker exec -it --user=root es /bin/bash -c "cp -f /usr/share/elasticsearch/config/log4j2.file.properties /usr/share/elasticsearch/config/log4j2.properties" && \
\
# tls transport &&\
docker cp ./es/elastic-certificates.p12 es:/usr/share/elasticsearch/config/ &&\
\
docker exec -it es /bin/bash -c "elasticsearch-keystore add xpack.security.transport.ssl.keystore.secure_password <<'EOF'
y
Pavd499UgsauUWvy
EOF
" &&\
docker exec -it es /bin/bash -c "elasticsearch-keystore add xpack.security.transport.ssl.truststore.secure_password <<'EOF'
Pavd499UgsauUWvy
EOF
" &&\
\
# tls https &&\
docker cp ./es/elasticsearch/http.p12 es:/usr/share/elasticsearch/config &&\
\
docker exec -it es /bin/bash -c "elasticsearch-keystore add xpack.security.http.ssl.keystore.secure_password <<'EOF'
4TE9TNrqKKHnPM56
EOF
" &&\
\
docker restart es &&\
docker logs -f es
# 계정 암호 설정

# 9200 포트 뜨면 실행 (netstat -ntlp 혹은 서버 로그로 확인)
docker exec -i es elasticsearch-setup-passwords interactive -u "https://172.31.12.163:9200" <<'EOF'
y
fqkVXD2oLV2jDpX0KDHy
fqkVXD2oLV2jDpX0KDHy
kbb5SRKWwnuiqQtwU94Z
kbb5SRKWwnuiqQtwU94Z
L4RkhRw21U0ACPjxtpw9
L4RkhRw21U0ACPjxtpw9
kPFj9haaiY9n3jSgXWrz
kPFj9haaiY9n3jSgXWrz
8dSKkRFReZaRWNR3QJU3
8dSKkRFReZaRWNR3QJU3
uZmgaCuqI8pjM5OIBg4k
uZmgaCuqI8pjM5OIBg4k
EOF
# tls 테스트
curl -v -k https://172.31.12.163:9200 -u elastic:fqkVXD2oLV2jDpX0KDHy
curl -v -k https://172.31.7.63:9200 -u elastic:fqkVXD2oLV2jDpX0KDHy
curl -v -k https://172.31.28.63:9200 -u elastic:fqkVXD2oLV2jDpX0KDHy
4. cluster 용 kibana 설치
monitoring 용이 별도로 있으므로 " -e XPACK_ENCRYPTEDSAVEDOBJECTS_ENCRYPTIONKEY=1dc16ed42aad17712d91a8047a7edfbd " 옵션은 사용하지 않는다.
## kibana
## key 는 "docker exec -it kibana kibana-encryption-keys generate" 를 통해 생성 가능하다.
## MONITORING_UI_ENABLED=false : monitoring 용 kibana 에서 볼 것이므로 stack monitoring 메뉴를 막는다
cd ~/tmp-es
docker stop kibana | true && docker rm kibana | true && \
\
docker run --restart="always" -itd --name kibana \
-p 5601:5601 \
-e SERVER_PORT=5601 \
-e ELASTICSEARCH_HOSTS='["https://172.31.12.163:9200","https://172.31.7.63:9200","https://172.31.28.63:9200"]' \
-e MONITORING_UI_ENABLED=false \
-e ELASTICSEARCH_SSL_CERTIFICATEAUTHORITIES='config/elasticsearch-ca.pem' \
-e ELASTICSEARCH_SSL_VERIFICATIONMODE=certificate \
-e ELASTICSEARCH_USERNAME=kibana_system \
kibana:7.12.0 && \
\
docker cp ./es/kibana/elasticsearch-ca.pem kibana:/usr/share/kibana/config/ &&\
\
docker exec -it kibana kibana-keystore create &&\
docker exec -it kibana /bin/bash -c "kibana-keystore add elasticsearch.password <<'EOF'
L4RkhRw21U0ACPjxtpw9
EOF
" &&\
docker restart kibana &&\
docker logs -f kibana
5. cluster 용 metricbeat 설치
## node-1 - 172.31.12.163
cd ~/tmp-es/
docker stop metricbeat | true && docker rm metricbeat | true && \
\
docker run --restart="always" -itd --name metricbeat --net host \
elastic/metricbeat:7.12.0 -e \
-E output.elasticsearch.hosts=['172.31.28.45:9200'] \
-E output.elasticsearch.protocol=https \
-E output.elasticsearch.username=remote_monitoring_user \
-E output.elasticsearch.password=Qpn9mbaxS1DwvruPH2J0 \
-E output.elasticsearch.ssl.certificate_authorities=["mon-elasticsearch-ca.pem"] \
-E output.elasticsearch.ssl.verification_mode=certificate \
&& \
\
docker cp ./mon/kibana/elasticsearch-ca.pem metricbeat:/usr/share/metricbeat/mon-elasticsearch-ca.pem &&\
docker cp ./es/kibana/elasticsearch-ca.pem metricbeat:/usr/share/metricbeat/es-elasticsearch-ca.pem &&\
\
docker exec -it metricbeat metricbeat modules disable system && \
docker exec -it metricbeat metricbeat modules enable elasticsearch-xpack && \
docker exec -it --user=root metricbeat /bin/bash -c "cat > /usr/share/metricbeat/modules.d/elasticsearch-xpack.yml <<'EOF'
# Module: elasticsearch
# Docs: https://www.elastic.co/guide/en/beats/metricbeat/7.x/metricbeat-module-elasticsearch.html

- module: elasticsearch
  xpack.enabled: true
  period: 10s
  hosts: ['https://172.31.12.163:9200']
  username: "remote_monitoring_user"
  password: "uZmgaCuqI8pjM5OIBg4k"
  ssl:
    enabled: true
    certificate_authorities: ["es-elasticsearch-ca.pem"]
    verification_mode: "certificate"
EOF
" && \
docker exec -it --user=root metricbeat /bin/bash -c "cat /usr/share/metricbeat/modules.d/elasticsearch-xpack.yml" && \
\
docker restart metricbeat && \
\
docker logs -f metricbeat
## node-2 - 172.31.7.63
cd ~/tmp-es/
docker stop metricbeat | true && docker rm metricbeat | true && \
\
docker run --restart="always" -itd --name metricbeat --net host \
elastic/metricbeat:7.12.0 -e \
-E output.elasticsearch.hosts=['172.31.28.45:9200'] \
-E output.elasticsearch.protocol=https \
-E output.elasticsearch.username=remote_monitoring_user \
-E output.elasticsearch.password=Qpn9mbaxS1DwvruPH2J0 \
-E output.elasticsearch.ssl.certificate_authorities=["mon-elasticsearch-ca.pem"] \
-E output.elasticsearch.ssl.verification_mode=certificate \
&& \
\
docker cp ./mon/kibana/elasticsearch-ca.pem metricbeat:/usr/share/metricbeat/mon-elasticsearch-ca.pem &&\
docker cp ./es/kibana/elasticsearch-ca.pem metricbeat:/usr/share/metricbeat/es-elasticsearch-ca.pem &&\
\
docker exec -it metricbeat metricbeat modules disable system && \
docker exec -it metricbeat metricbeat modules enable elasticsearch-xpack && \
docker exec -it --user=root metricbeat /bin/bash -c "cat > /usr/share/metricbeat/modules.d/elasticsearch-xpack.yml <<'EOF'
# Module: elasticsearch
# Docs: https://www.elastic.co/guide/en/beats/metricbeat/7.x/metricbeat-module-elasticsearch.html

- module: elasticsearch
  xpack.enabled: true
  period: 10s
  hosts: ['https://172.31.7.63:9200']
  username: "remote_monitoring_user"
  password: "uZmgaCuqI8pjM5OIBg4k"
  ssl:
    enabled: true
    certificate_authorities: ["es-elasticsearch-ca.pem"]
    verification_mode: "certificate"
EOF
" && \
docker exec -it --user=root metricbeat /bin/bash -c "cat /usr/share/metricbeat/modules.d/elasticsearch-xpack.yml" && \
\
docker restart metricbeat && \
\
docker logs -f metricbeat
## node-3 - 172.31.28.63
cd ~/tmp-es/
docker stop metricbeat | true && docker rm metricbeat | true && \
\
docker run --restart="always" -itd --name metricbeat --net host \
elastic/metricbeat:7.12.0 -e \
-E output.elasticsearch.hosts=['172.31.28.45:9200'] \
-E output.elasticsearch.protocol=https \
-E output.elasticsearch.username=remote_monitoring_user \
-E output.elasticsearch.password=Qpn9mbaxS1DwvruPH2J0 \
-E output.elasticsearch.ssl.certificate_authorities=["mon-elasticsearch-ca.pem"] \
-E output.elasticsearch.ssl.verification_mode=certificate \
&& \
\
docker cp ./mon/kibana/elasticsearch-ca.pem metricbeat:/usr/share/metricbeat/mon-elasticsearch-ca.pem &&\
docker cp ./es/kibana/elasticsearch-ca.pem metricbeat:/usr/share/metricbeat/es-elasticsearch-ca.pem &&\
\
docker exec -it metricbeat metricbeat modules disable system && \
docker exec -it metricbeat metricbeat modules enable elasticsearch-xpack && \
docker exec -it --user=root metricbeat /bin/bash -c "cat > /usr/share/metricbeat/modules.d/elasticsearch-xpack.yml <<'EOF'
# Module: elasticsearch
# Docs: https://www.elastic.co/guide/en/beats/metricbeat/7.x/metricbeat-module-elasticsearch.html

- module: elasticsearch
  xpack.enabled: true
  period: 10s
  hosts: ['https://172.31.28.63:9200']
  username: "remote_monitoring_user"
  password: "uZmgaCuqI8pjM5OIBg4k"
  ssl:
    enabled: true
    certificate_authorities: ["es-elasticsearch-ca.pem"]
    verification_mode: "certificate"
EOF
" && \
docker exec -it --user=root metricbeat /bin/bash -c "cat /usr/share/metricbeat/modules.d/elasticsearch-xpack.yml" && \
\
docker restart metricbeat && \
\
docker logs -f metricbeat
6. cluster 용 filebeat 설치
## node-1 - 172.31.12.163
cd ~/tmp-es/
docker stop filebeat | true && docker rm filebeat | true && \
docker run --restart="always" -itd --name filebeat \
-v /service/otoplug/log/es:/var/log/elasticsearch \
elastic/filebeat:7.12.0 -e \
-E output.elasticsearch.hosts=['https://172.31.28.45:9200'] \
-E output.elasticsearch.username=elastic \
-E output.elasticsearch.password=uOpqcL06cHWgJcNMiw1I \
-E output.elasticsearch.ssl.certificate_authorities=["mon-elasticsearch-ca.pem"] \
-E output.elasticsearch.ssl.verification_mode=certificate && \
\
docker cp ./mon/kibana/elasticsearch-ca.pem filebeat:/usr/share/filebeat/mon-elasticsearch-ca.pem &&\
docker exec -it filebeat ls -al /usr/share/filebeat/ &&\
\
docker exec -it filebeat filebeat modules enable elasticsearch && \
\
docker restart filebeat && \
\
docker logs -f filebeat
## node-2 - 172.31.7.63
cd ~/tmp-es/
docker stop filebeat | true && docker rm filebeat | true && \
docker run --restart="always" -itd --name filebeat \
-v /service/otoplug/log/es:/var/log/elasticsearch \
elastic/filebeat:7.12.0 -e \
-E output.elasticsearch.hosts=['https://172.31.28.45:9200'] \
-E output.elasticsearch.username=elastic \
-E output.elasticsearch.password=uOpqcL06cHWgJcNMiw1I \
-E output.elasticsearch.ssl.certificate_authorities=["mon-elasticsearch-ca.pem"] \
-E output.elasticsearch.ssl.verification_mode=certificate && \
\
docker cp ./mon/kibana/elasticsearch-ca.pem filebeat:/usr/share/filebeat/mon-elasticsearch-ca.pem &&\
docker exec -it filebeat ls -al /usr/share/filebeat/ &&\
\
docker exec -it filebeat filebeat modules enable elasticsearch && \
\
docker restart filebeat && \
\
docker logs -f filebeat
## node-3 - 172.31.28.63
cd ~/tmp-es/
docker stop filebeat | true && docker rm filebeat | true && \
docker run --restart="always" -itd --name filebeat \
-v /service/otoplug/log/es:/var/log/elasticsearch \
elastic/filebeat:7.12.0 -e \
-E output.elasticsearch.hosts=['https://172.31.28.45:9200'] \
-E output.elasticsearch.username=elastic \
-E output.elasticsearch.password=uOpqcL06cHWgJcNMiw1I \
-E output.elasticsearch.ssl.certificate_authorities=["mon-elasticsearch-ca.pem"] \
-E output.elasticsearch.ssl.verification_mode=certificate && \
\
docker cp ./mon/kibana/elasticsearch-ca.pem filebeat:/usr/share/filebeat/mon-elasticsearch-ca.pem &&\
docker exec -it filebeat ls -al /usr/share/filebeat/ &&\
\
docker exec -it filebeat filebeat modules enable elasticsearch && \
\
docker restart filebeat && \
\
docker logs -f filebeat
Cluster - security, tls(transport)
security 기능을 사용하려면 Transport SSL 을 사용해야 한다.
그렇지 않으면 처음엔 서버가 시작될 순 있어도 재시작시 에러 발생하여 서버를 띄울 수 없다.
# 에러 내용
[node-2] node validation exception
[1] bootstrap checks failed. You must address the points described in the following [1] lines before starting Elasticsearch.
bootstrap check failure [1] of [1]: Transport SSL must be enabled if security is enabled on a [basic] license. Please set [xpack.security.transport.ssl.enabled] to [true] or disable security by setting [xpack.security.enabled] to [false]
1. 키, 암호 정보
* monitoring 용 TLS 키
CA
- 파일 : ~/tmp-es/mon/elastic-stack-ca.p12
- 암호 : W8B3X2eBLjafrZ6U
Certificate (private key)
- 파일 : ~/tmp-es/mon/elastic-certificates.p12
- 암호 : pnpXneCHdzbJW3q2
# 사용한 명령 - 스크립트 실행시 에 도메인과 IP 를 정확히 기입해야 한다.
mkdir ~/tmp-es/mon | true && cd ~/tmp-es/mon &&\
\
# 인증서 생성용 es &&\
docker stop tmp-es | true && docker rm tmp-es | true &&\
docker run -itd --name tmp-es \
-e discovery.type=single-node \
-e xpack.security.enabled=true \
elasticsearch:7.12.0 &&\
\
# CA 파일 생성 : /usr/share/elasticsearch/elastic-stack-ca.p12 에 생성됨. &&\
# CA 파일 : elastic-stack-ca.p12 &&\
# CA 암호 : W8B3X2eBLjafrZ6U &&\
docker exec -it tmp-es /bin/bash -c "elasticsearch-certutil ca <<'EOF'
elastic-stack-ca.p12
W8B3X2eBLjafrZ6U
EOF
" &&\
\
# private key 파일 생성 : /usr/share/elasticsearch/elastic-certificates.p12 에 생성됨. &&\
# private key 파일 : elastic-certificates.p12 &&\
# private key 암호 : pnpXneCHdzbJW3q2 &&\
docker exec -it tmp-es /bin/bash -c "elasticsearch-certutil cert --ca elastic-stack-ca.p12 <<'EOF'
W8B3X2eBLjafrZ6U
elastic-certificates.p12
pnpXneCHdzbJW3q2
EOF
" &&\
\
# ca 파일 복사 &&\
docker cp tmp-es:/usr/share/elasticsearch/elastic-stack-ca.p12 ./ &&\
docker cp tmp-es:/usr/share/elasticsearch/elastic-certificates.p12 ./ &&\
\
# 삭제 &&\
docker stop tmp-es && docker rm tmp-es &&\
ls -al
* Cluster 용 TLS 키 및 계정 암호
CA
- 파일 : ~/tmp-es/es/elastic-stack-ca.p12
- 암호 : 7Z2DFdnJJBc6NtqJ
Certificate (private key)
- 파일 : ~/tmp-es/es/elastic-certificates.p12
- 암호 : Pavd499UgsauUWvy
# 사용한 명령 - 스크립트 실행시 에 도메인과 IP 를 정확히 기입해야 한다

mkdir ~/tmp-es/es | true && cd ~/tmp-es/es &&\
\
# 인증서 생성용 es &&\
docker stop tmp-es | true && docker rm tmp-es | true &&\
docker run -itd --name tmp-es \
-e discovery.type=single-node \
-e xpack.security.enabled=true \
elasticsearch:7.12.0 &&\
\
# CA 파일 생성 : /usr/share/elasticsearch/elastic-stack-ca.p12 에 생성됨. &&\
# CA 파일 : elastic-stack-ca.p12 &&\
# CA 암호 : 7Z2DFdnJJBc6NtqJ &&\
docker exec -it tmp-es /bin/bash -c "elasticsearch-certutil ca <<'EOF'
elastic-stack-ca.p12
7Z2DFdnJJBc6NtqJ
EOF
" &&\
\
# private key 파일 생성 : /usr/share/elasticsearch/elastic-certificates.p12 에 생성됨. &&\
# private key 파일 : elastic-certificates.p12 &&\
# private key 암호 : Pavd499UgsauUWvy &&\
docker exec -it tmp-es /bin/bash -c "elasticsearch-certutil cert --ca elastic-stack-ca.p12 <<'EOF'
7Z2DFdnJJBc6NtqJ
elastic-certificates.p12
Pavd499UgsauUWvy
EOF
" &&\
\
# ca 파일 복사 &&\
docker cp tmp-es:/usr/share/elasticsearch/elastic-stack-ca.p12 ./ &&\
docker cp tmp-es:/usr/share/elasticsearch/elastic-certificates.p12 ./ &&\
\
# 삭제 &&\
docker stop tmp-es && docker rm tmp-es &&\
ls -al
- monitoring 용 elasticsearch 계정 암호
- apm_system = Flojnt90VXjgt0S9O9ey
- kibana_system = VIEd22kY8DtL5tqwEsAq
- kibana = VIEd22kY8DtL5tqwEsAq
- logstash_system = aTOvzx8bnjWLxBiSfnHE
- beats_system = fiPUPLnBf0tR5kBcSo16
- remote_monitoring_user = Qpn9mbaxS1DwvruPH2J0
- elastic = uOpqcL06cHWgJcNMiw1I
- cluster 용 elasticsearch 계정 암호
- apm_system = kbb5SRKWwnuiqQtwU94Z
- kibana_system = L4RkhRw21U0ACPjxtpw9
- kibana = L4RkhRw21U0ACPjxtpw9
- logstash_system = kPFj9haaiY9n3jSgXWrz
- beats_system = 8dSKkRFReZaRWNR3QJU3
- remote_monitoring_user = uZmgaCuqI8pjM5OIBg4k
- elastic = fqkVXD2oLV2jDpX0KDHy
- kibana encriptionkey
- monitoring 용 kibana : 1dc16ed42aad17712d91a8047a7edfbd
- cluster 용 kibana : 1dc16ed42aad17712d91a8047a7edfbd
2. monitoring 용 elasticsearch/kibana 설치
# monitoring 용 elasticsearch single node 설치
cd ~/tmp-es &&\
\
docker stop mon-es | true && docker rm mon-es | true &&\
\
rm -rf /service/otoplug/data/mon-es/* /service/otoplug/log/mon-es/* &&\
mkdir -p /service/otoplug/data/mon-es /service/otoplug/log/mon-es &&\
\
docker run --restart="always" -itd --name mon-es --net host --user $UID \
-p 9200:9200 -p 9300:9300 \
-e http.port=9200 \
-e transport.port=9300 \
-e discovery.type=single-node \
-e xpack.security.enabled=true \
-e xpack.security.transport.ssl.enabled=true \
-e xpack.security.transport.ssl.verification_mode=certificate \
-e xpack.security.transport.ssl.client_authentication=none \
-e xpack.security.transport.ssl.keystore.path=elastic-certificates.p12 \
-e xpack.security.transport.ssl.truststore.path=elastic-certificates.p12 \
-v /service/otoplug/log/mon-es:/usr/share/elasticsearch/logs \
-v /service/otoplug/data/mon-es:/usr/share/elasticsearch/data \
elasticsearch:7.12.0 &&\
\
sleep 3s &&\
\
# enable file logging &&\
docker exec -it --user=root mon-es /bin/bash -c "cp -f /usr/share/elasticsearch/config/log4j2.properties /usr/share/elasticsearch/config/log4j2.console.properties" &&\
docker exec -it --user=root mon-es /bin/bash -c "cp -f /usr/share/elasticsearch/config/log4j2.file.properties /usr/share/elasticsearch/config/log4j2.properties" &&\
\
# transport &&\
docker cp ./mon/elastic-certificates.p12 mon-es:/usr/share/elasticsearch/config/ &&\
\
docker exec -it mon-es /bin/bash -c "elasticsearch-keystore add xpack.security.transport.ssl.keystore.secure_password <<'EOF'
pnpXneCHdzbJW3q2
EOF
" &&\
docker exec -it mon-es /bin/bash -c "elasticsearch-keystore add xpack.security.transport.ssl.truststore.secure_password <<'EOF'
pnpXneCHdzbJW3q2
EOF
" &&\
\
docker restart mon-es &&\
docker logs -f mon-es
# monotoring elasticsearch security 설정 및 테스트

# 구동 완료후 실행
# 계정 암호 설정
docker exec -i mon-es elasticsearch-setup-passwords interactive -url "http://localhost:9200" <<'EOF'
y
uOpqcL06cHWgJcNMiw1I
uOpqcL06cHWgJcNMiw1I
Flojnt90VXjgt0S9O9ey
Flojnt90VXjgt0S9O9ey
VIEd22kY8DtL5tqwEsAq
VIEd22kY8DtL5tqwEsAq
aTOvzx8bnjWLxBiSfnHE
aTOvzx8bnjWLxBiSfnHE
fiPUPLnBf0tR5kBcSo16
fiPUPLnBf0tR5kBcSo16
Qpn9mbaxS1DwvruPH2J0
Qpn9mbaxS1DwvruPH2J0
EOF


# 테스트
curl -v http://localhost:9200 -u elastic:uOpqcL06cHWgJcNMiw1I
## monitoring kibana : mon-kibana
## key 는 "docker exec -it kibana kibana-encryption-keys generate" 를 통해 생성 가능하다.

cd ~/tmp-es/
docker stop mon-kibana | true && docker rm mon-kibana | true && \
\
docker run --restart="always" -itd --name mon-kibana --net host \
-p 15601:15601 \
-e SERVER_PORT=15601 \
-e ELASTICSEARCH_HOSTS='["http://localhost:9200"]' \
-e XPACK_ENCRYPTEDSAVEDOBJECTS_ENCRYPTIONKEY=1dc16ed42aad17712d91a8047a7edfbd \
-e ELASTICSEARCH_USERNAME=kibana_system \
kibana:7.12.0 && \
\
docker exec -it mon-kibana kibana-keystore create &&\
docker exec -it mon-kibana /bin/bash -c "kibana-keystore add elasticsearch.password <<'EOF'
VIEd22kY8DtL5tqwEsAq
EOF
" &&\
docker restart mon-kibana &&\
docker logs -f mon-kibana
3. cluster 용 elasticsearch 설치
## node-1 - 172.31.12.163
set -x
cd ~/tmp-es/
mkdir -p /service/otoplug/data/es /service/otoplug/log/es && \
rm -rf /service/otoplug/data/es/* /service/otoplug/log/es/* &&\
\
docker stop es | true && docker rm es | true &&\
docker run --restart="always" -itd --net host --name es --user $UID \
-p 9200:9200 -p 9300:9300 \
--cpus="2.0" \
-e network.host=172.31.12.163 \
-e cluster.name=cluster-1 \
-e node.name=node-1 \
-e node.master=true \
-e node.data=true \
-e discovery.seed_hosts=172.31.12.163,172.31.7.63,172.31.28.63 \
-e cluster.initial_master_nodes=node-1,node-2,node-3 \
-e bootstrap.memory_lock=true \
-e xpack.monitoring.collection.enabled=true \
-e xpack.monitoring.elasticsearch.collection.enabled=false \
-e xpack.security.enabled=true \
-e xpack.security.transport.ssl.enabled=true \
-e xpack.security.transport.ssl.verification_mode=certificate  \
-e xpack.security.transport.ssl.client_authentication=none \
-e xpack.security.transport.ssl.keystore.path=elastic-certificates.p12 \
-e xpack.security.transport.ssl.truststore.path=elastic-certificates.p12 \
--ulimit memlock=-1:-1 \
-v /service/otoplug/log/es:/usr/share/elasticsearch/logs \
-v /service/otoplug/data/es:/usr/share/elasticsearch/data \
docker.elastic.co/elasticsearch/elasticsearch:7.12.0 && \
\
# enable file logging &&\
docker exec -it --user=root es /bin/bash -c "cp -f /usr/share/elasticsearch/config/log4j2.properties /usr/share/elasticsearch/config/log4j2.console.properties" && \
docker exec -it --user=root es /bin/bash -c "cp -f /usr/share/elasticsearch/config/log4j2.file.properties /usr/share/elasticsearch/config/log4j2.properties" && \
\
# tls transport &&\
docker cp ./es/elastic-certificates.p12 es:/usr/share/elasticsearch/config/ &&\
\
docker exec -it es /bin/bash -c "elasticsearch-keystore add xpack.security.transport.ssl.keystore.secure_password <<'EOF'
y
Pavd499UgsauUWvy
EOF
" &&\
docker exec -it es /bin/bash -c "elasticsearch-keystore add xpack.security.transport.ssl.truststore.secure_password <<'EOF'
Pavd499UgsauUWvy
EOF
" &&\
\
sleep 10s &&\
docker restart es &&\
docker logs -f es
## node-2 - 172.31.7.63
set -x
cd ~/tmp-es/
mkdir -p /service/otoplug/data/es /service/otoplug/log/es && \
rm -rf /service/otoplug/data/es/* /service/otoplug/log/es/* &&\
\
docker stop es | true && docker rm es | true &&\
docker run --restart="always" -itd --net host --name es --user $UID \
-p 9200:9200 -p 9300:9300 \
--cpus="2.0" \
-e network.host=172.31.7.63 \
-e cluster.name=cluster-1 \
-e node.name=node-2 \
-e node.master=true \
-e node.data=true \
-e discovery.seed_hosts=172.31.12.163,172.31.7.63,172.31.28.63 \
-e cluster.initial_master_nodes=node-1,node-2,node-3 \
-e bootstrap.memory_lock=true \
-e xpack.monitoring.collection.enabled=true \
-e xpack.monitoring.elasticsearch.collection.enabled=false \
-e xpack.security.enabled=true \
-e xpack.security.transport.ssl.enabled=true \
-e xpack.security.transport.ssl.verification_mode=certificate  \
-e xpack.security.transport.ssl.client_authentication=none \
-e xpack.security.transport.ssl.keystore.path=elastic-certificates.p12 \
-e xpack.security.transport.ssl.truststore.path=elastic-certificates.p12 \
--ulimit memlock=-1:-1 \
-v /service/otoplug/log/es:/usr/share/elasticsearch/logs \
-v /service/otoplug/data/es:/usr/share/elasticsearch/data \
docker.elastic.co/elasticsearch/elasticsearch:7.12.0 && \
\
# enable file logging &&\
docker exec -it --user=root es /bin/bash -c "cp -f /usr/share/elasticsearch/config/log4j2.properties /usr/share/elasticsearch/config/log4j2.console.properties" && \
docker exec -it --user=root es /bin/bash -c "cp -f /usr/share/elasticsearch/config/log4j2.file.properties /usr/share/elasticsearch/config/log4j2.properties" && \
\
# tls transport &&\
docker cp ./es/elastic-certificates.p12 es:/usr/share/elasticsearch/config/ &&\
\
docker exec -it es /bin/bash -c "elasticsearch-keystore add xpack.security.transport.ssl.keystore.secure_password <<'EOF'
y
Pavd499UgsauUWvy
EOF
" &&\
docker exec -it es /bin/bash -c "elasticsearch-keystore add xpack.security.transport.ssl.truststore.secure_password <<'EOF'
Pavd499UgsauUWvy
EOF
" &&\
\
sleep 10s &&\
docker restart es &&\
docker logs -f es
## node-3 - 172.31.28.63
set -x
cd ~/tmp-es/
mkdir -p /service/otoplug/data/es /service/otoplug/log/es && \
rm -rf /service/otoplug/data/es/* /service/otoplug/log/es/* &&\
\
docker stop es | true && docker rm es | true &&\
docker run --restart="always" -itd --net host --name es --user $UID \
-p 9200:9200 -p 9300:9300 \
--cpus="2.0" \
-e network.host=172.31.28.63 \
-e cluster.name=cluster-1 \
-e node.name=node-3 \
-e node.master=true \
-e node.data=true \
-e discovery.seed_hosts=172.31.12.163,172.31.7.63,172.31.28.63 \
-e cluster.initial_master_nodes=node-1,node-2,node-3 \
-e bootstrap.memory_lock=true \
-e xpack.monitoring.collection.enabled=true \
-e xpack.monitoring.elasticsearch.collection.enabled=false \
-e xpack.security.enabled=true \
-e xpack.security.transport.ssl.enabled=true \
-e xpack.security.transport.ssl.verification_mode=certificate  \
-e xpack.security.transport.ssl.client_authentication=none \
-e xpack.security.transport.ssl.keystore.path=elastic-certificates.p12 \
-e xpack.security.transport.ssl.truststore.path=elastic-certificates.p12 \
--ulimit memlock=-1:-1 \
-v /service/otoplug/log/es:/usr/share/elasticsearch/logs \
-v /service/otoplug/data/es:/usr/share/elasticsearch/data \
docker.elastic.co/elasticsearch/elasticsearch:7.12.0 && \
\
# enable file logging &&\
docker exec -it --user=root es /bin/bash -c "cp -f /usr/share/elasticsearch/config/log4j2.properties /usr/share/elasticsearch/config/log4j2.console.properties" && \
docker exec -it --user=root es /bin/bash -c "cp -f /usr/share/elasticsearch/config/log4j2.file.properties /usr/share/elasticsearch/config/log4j2.properties" && \
\
# tls transport &&\
docker cp ./es/elastic-certificates.p12 es:/usr/share/elasticsearch/config/ &&\
\
docker exec -it es /bin/bash -c "elasticsearch-keystore add xpack.security.transport.ssl.keystore.secure_password <<'EOF'
y
Pavd499UgsauUWvy
EOF
" &&\
docker exec -it es /bin/bash -c "elasticsearch-keystore add xpack.security.transport.ssl.truststore.secure_password <<'EOF'
Pavd499UgsauUWvy
EOF
" &&\
\
sleep 10s &&\
docker restart es &&\
docker logs -f es
# 계정 암호 설정

# 9200 포트 뜨면 실행 (netstat -ntlp 혹은 서버 로그로 확인)
docker exec -i es elasticsearch-setup-passwords interactive -u "http://172.31.12.163:9200" <<'EOF'
y
fqkVXD2oLV2jDpX0KDHy
fqkVXD2oLV2jDpX0KDHy
kbb5SRKWwnuiqQtwU94Z
kbb5SRKWwnuiqQtwU94Z
L4RkhRw21U0ACPjxtpw9
L4RkhRw21U0ACPjxtpw9
kPFj9haaiY9n3jSgXWrz
kPFj9haaiY9n3jSgXWrz
8dSKkRFReZaRWNR3QJU3
8dSKkRFReZaRWNR3QJU3
uZmgaCuqI8pjM5OIBg4k
uZmgaCuqI8pjM5OIBg4k
EOF
# 테스트
curl http://172.31.12.163:9200 -u elastic:fqkVXD2oLV2jDpX0KDHy
curl http://172.31.7.63:9200 -u elastic:fqkVXD2oLV2jDpX0KDHy
curl http://172.31.28.63:9200 -u elastic:fqkVXD2oLV2jDpX0KDHy
4. cluster 용 kibana 설치
monitoring 용이 별도로 있으므로 " -e XPACK_ENCRYPTEDSAVEDOBJECTS_ENCRYPTIONKEY=1dc16ed42aad17712d91a8047a7edfbd " 옵션은 사용하지 않는다.
## kibana
## key 는 "docker exec -it kibana kibana-encryption-keys generate" 를 통해 생성 가능하다.
## MONITORING_UI_ENABLED=false : monitoring 용 kibana 에서 볼 것이므로 stack monitoring 메뉴를 막는다
cd ~/tmp-es
docker stop kibana | true && docker rm kibana | true && \
\
docker run --restart="always" -itd --name kibana \
-p 5601:5601 \
-e SERVER_PORT=5601 \
-e ELASTICSEARCH_HOSTS='["http://172.31.12.163:9200","http://172.31.7.63:9200","http://172.31.28.63:9200"]' \
-e MONITORING_UI_ENABLED=false \
-e ELASTICSEARCH_USERNAME=kibana_system \
kibana:7.12.0 && \
\
docker exec -it kibana kibana-keystore create &&\
docker exec -it kibana /bin/bash -c "kibana-keystore add elasticsearch.password <<'EOF'
L4RkhRw21U0ACPjxtpw9
EOF
" &&\
docker restart kibana &&\
docker logs -f kibana
5. cluster 용 metricbeat 설치
## node-1 - 172.31.12.163
cd ~/tmp-es/
docker stop metricbeat | true && docker rm metricbeat | true && \
\
docker run --restart="always" -itd --name metricbeat --net host \
elastic/metricbeat:7.12.0 -e \
-E output.elasticsearch.hosts=['172.31.28.45:9200'] \
-E output.elasticsearch.username=remote_monitoring_user \
-E output.elasticsearch.password=Qpn9mbaxS1DwvruPH2J0 \
&& \
\
sleep 3s &&\
\
docker exec -it metricbeat metricbeat modules disable system && \
docker exec -it metricbeat metricbeat modules enable elasticsearch-xpack && \
docker exec -it --user=root metricbeat /bin/bash -c "cat > /usr/share/metricbeat/modules.d/elasticsearch-xpack.yml <<'EOF'
# Module: elasticsearch
# Docs: https://www.elastic.co/guide/en/beats/metricbeat/7.x/metricbeat-module-elasticsearch.html

- module: elasticsearch
  xpack.enabled: true
  period: 10s
  hosts: ['http://172.31.12.163:9200']
  username: "remote_monitoring_user"
  password: "uZmgaCuqI8pjM5OIBg4k"
EOF
" && \
docker exec -it --user=root metricbeat /bin/bash -c "cat /usr/share/metricbeat/modules.d/elasticsearch-xpack.yml" && \
\
docker restart metricbeat && \
\
docker logs -f metricbeat
## node-2 - 172.31.7.63
cd ~/tmp-es/
docker stop metricbeat | true && docker rm metricbeat | true && \
\
docker run --restart="always" -itd --name metricbeat --net host \
elastic/metricbeat:7.12.0 -e \
-E output.elasticsearch.hosts=['172.31.28.45:9200'] \
-E output.elasticsearch.username=remote_monitoring_user \
-E output.elasticsearch.password=Qpn9mbaxS1DwvruPH2J0 \
&& \
\
sleep 3s &&\
\
docker exec -it metricbeat metricbeat modules disable system && \
docker exec -it metricbeat metricbeat modules enable elasticsearch-xpack && \
docker exec -it --user=root metricbeat /bin/bash -c "cat > /usr/share/metricbeat/modules.d/elasticsearch-xpack.yml <<'EOF'
# Module: elasticsearch
# Docs: https://www.elastic.co/guide/en/beats/metricbeat/7.x/metricbeat-module-elasticsearch.html

- module: elasticsearch
  xpack.enabled: true
  period: 10s
  hosts: ['http://172.31.7.63:9200']
  username: "remote_monitoring_user"
  password: "uZmgaCuqI8pjM5OIBg4k"
EOF
" && \
docker exec -it --user=root metricbeat /bin/bash -c "cat /usr/share/metricbeat/modules.d/elasticsearch-xpack.yml" && \
\
docker restart metricbeat && \
\
docker logs -f metricbeat
## node-3 - 172.31.28.63
cd ~/tmp-es/
docker stop metricbeat | true && docker rm metricbeat | true && \
\
docker run --restart="always" -itd --name metricbeat --net host \
elastic/metricbeat:7.12.0 -e \
-E output.elasticsearch.hosts=['172.31.28.45:9200'] \
-E output.elasticsearch.username=remote_monitoring_user \
-E output.elasticsearch.password=Qpn9mbaxS1DwvruPH2J0 \
&& \
\
sleep 3s &&\
\
docker exec -it metricbeat metricbeat modules disable system && \
docker exec -it metricbeat metricbeat modules enable elasticsearch-xpack && \
docker exec -it --user=root metricbeat /bin/bash -c "cat > /usr/share/metricbeat/modules.d/elasticsearch-xpack.yml <<'EOF'
# Module: elasticsearch
# Docs: https://www.elastic.co/guide/en/beats/metricbeat/7.x/metricbeat-module-elasticsearch.html

- module: elasticsearch
  xpack.enabled: true
  period: 10s
  hosts: ['http://172.31.28.63:9200']
  username: "remote_monitoring_user"
  password: "uZmgaCuqI8pjM5OIBg4k"
EOF
" && \
docker exec -it --user=root metricbeat /bin/bash -c "cat /usr/share/metricbeat/modules.d/elasticsearch-xpack.yml" && \
\
docker restart metricbeat && \
\
docker logs -f metricbeat
6. cluster 용 filebeat 설치
## node-1 - 172.31.12.163
cd ~/tmp-es/
docker stop filebeat | true && docker rm filebeat | true && \
docker run --restart="always" -itd --name filebeat \
-v /service/otoplug/log/es:/var/log/elasticsearch \
elastic/filebeat:7.12.0 -e \
-E output.elasticsearch.hosts=['http://172.31.28.45:9200'] \
-E output.elasticsearch.username=elastic \
-E output.elasticsearch.password=uOpqcL06cHWgJcNMiw1I \
&&\
\
docker exec -it filebeat ls -al /usr/share/filebeat/ &&\
\
docker exec -it filebeat filebeat modules enable elasticsearch && \
\
docker restart filebeat && \
\
docker logs -f filebeat
## node-2 - 172.31.7.63
cd ~/tmp-es/
docker stop filebeat | true && docker rm filebeat | true && \
docker run --restart="always" -itd --name filebeat \
-v /service/otoplug/log/es:/var/log/elasticsearch \
elastic/filebeat:7.12.0 -e \
-E output.elasticsearch.hosts=['http://172.31.28.45:9200'] \
-E output.elasticsearch.username=elastic \
-E output.elasticsearch.password=uOpqcL06cHWgJcNMiw1I \
&&\
\
docker exec -it filebeat ls -al /usr/share/filebeat/ &&\
\
docker exec -it filebeat filebeat modules enable elasticsearch && \
\
docker restart filebeat && \
\
docker logs -f filebeat
## node-3 - 172.31.28.63
cd ~/tmp-es/
docker stop filebeat | true && docker rm filebeat | true && \
docker run --restart="always" -itd --name filebeat \
-v /service/otoplug/log/es:/var/log/elasticsearch \
elastic/filebeat:7.12.0 -e \
-E output.elasticsearch.hosts=['http://172.31.28.45:9200'] \
-E output.elasticsearch.username=elastic \
-E output.elasticsearch.password=uOpqcL06cHWgJcNMiw1I \
&&\
\
docker exec -it filebeat ls -al /usr/share/filebeat/ &&\
\
docker exec -it filebeat filebeat modules enable elasticsearch && \
\
docker restart filebeat && \
\
docker logs -f filebeat